


Reverse Confetti Countdown Release May 8th- Sneak Peeks Day 1
- Cheryl Espie

- May 5, 2022
- 3 min read
Updated: May 18, 2022


Hello, crafty friends!
I'm thrilled to be joining Reverse Confetti along with some amazingly talented designers for their upcoming release on May 8th, 2022.
Today starts the countdown to this release so I am sharing some sneak peeks using stamp sets with their co-ordinating Confetti Cuts and some Stand Confetti Cuts.
Reverse Confetti are releasing 6 new stamp sets and 10 new Confetti Cuts plus, there's a free stamp set with every qualifying purchase! There will be sneak peek posts each day now until the release on May 8th.
See below for details on how you can follow the sneak peeks and have a chance to win giveaway prizes......

Win Prizes!
Reverse Confetti are giving away a $25 gift certificate for a blog commenter & $25 gift certificate for a Facebook Commenter.
Be sure to leave some love at every stop and make sure you head over to the Reverse Confett's Facebook Page following each days countdown day's blog hop.
***Comments close noon CST May 7th, 2022 and the winner will be announced 5pm May 7th, 2022 on the Reverse Confetti Blog & Facebook Page.***


The Birthday Buddies stamp set is such a cutie and the matching puns in the Birthday Buddies Banter set is a perfect match! My first sneak peek shows a cute kitten and his birthday presents.
I used a technique called masking for this design. With masking, one rule of thumb is this...the image that you want on full show when the card is complete, is the image you stamp first and mask first. Therefore, I stamped the cat and box, then stamped the same image on masking paper and fussy cut it out. I repeated this process for my second stamped image of the pile of presents.

You will see that I added a heart background. This was achieved by having both images masked off then, using a stencil (any shape would do). I ink blended some of my oxide ink to the white space around all the masked areas. Before peeling away any masking, I added some white splatter, just to give it a little something extra.
I don't know if it is just me, but gosh I love peeling away the masking to reveal the final effect. It always blows me away!
To colour the images I used my Copic markers BG13, BG18, E70 & E74. R21 for the nose and ears.

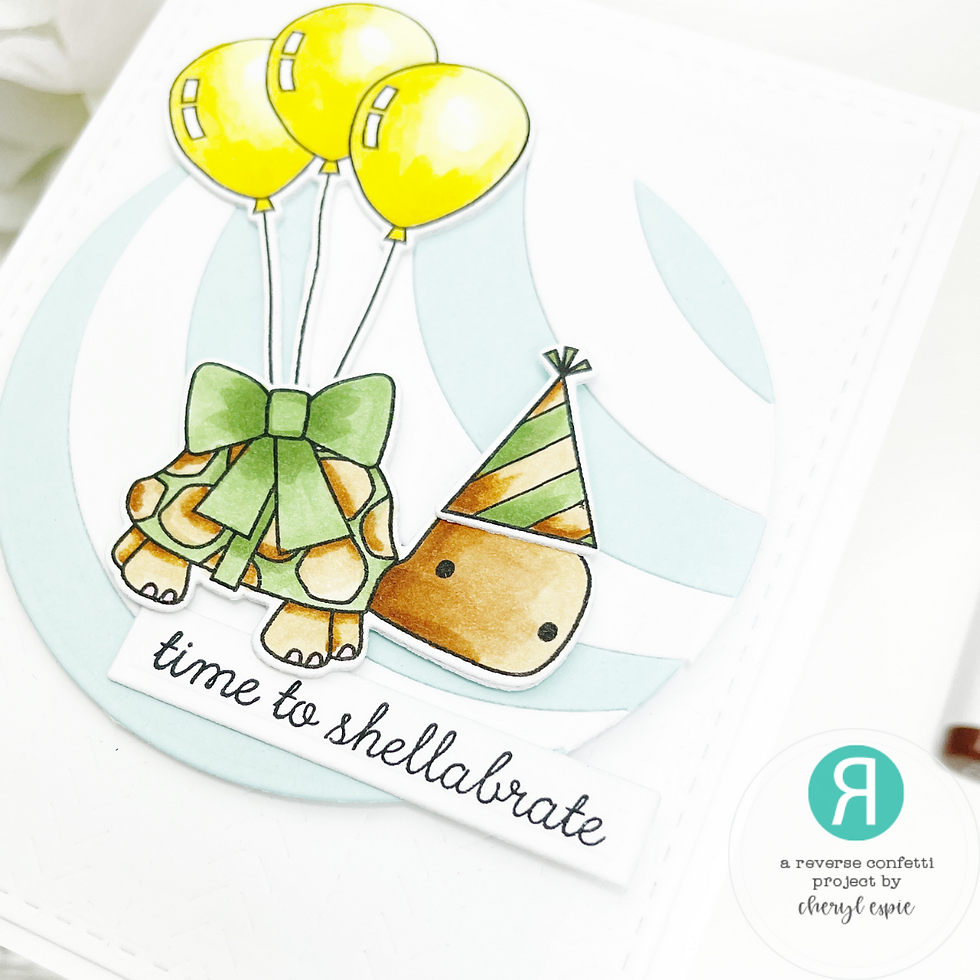
Look at this little guy!!!!
Goodness, sooooo cuuuuute!
Anyway, lets talk about the design and not get distracted with such cuteness, hahaha!
So, pretty straight forward- I cut out the images and coloured them with Copic markers: Balloons-Y00, Y11 & Y15 & Mr. Turtle-G21, G24, G94, E31, E34 & E37.
I used the Large Rainbow Circle Confetti Cut in this release to create the blue and white circle behind Mr. Turtle.
For some added texture, which I like sometimes with coloured images, I cut out the new Folklore Cover Plate from the new release. This really added something actually so that was a good idea and always worth thinking about if you think your cardstock matting needs a little something extra.
Do you want to see what the other wonderful designers have created for their sneak peeks?
Below is the full blog list, so go show some love and remember to leave your comments for your chance to win!
Thanks so much for hopping along and I will see you tomorrow for Sneak Peeks Day 2!


Oh that turtle is soooo cute!
Darling animals. Lucky the turtle
has the balloons to help him get
around faster. thanks for sharing
txmlhl(at)yahoo(dot)com
The turtle is adorable!
Adorable cards! Love the kitty and turtle!
- Denise Bryant
These are all so adorable!!!!